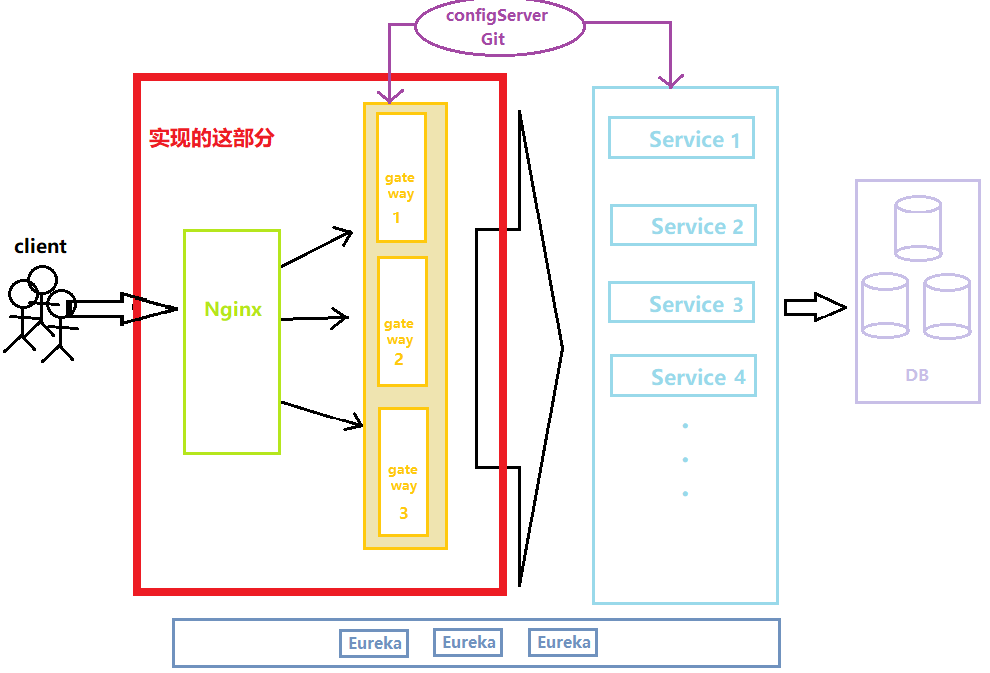
高可用网关集群示意图:

自己画的2333
nginx概述
nginx是一个开源的,支持高性能、高并发的www服务和代理服务软件。
它是一个俄罗斯人lgor sysoev开发的,作者将源代码开源出来供全球使用。 nginx比它大哥apache性能改进许多,nginx占用的系统资源更少,支持更高的并发连接,有更高的访问效率。
nginx不但是一个优秀的web服务软件,支持反向代理,负载均衡,以及缓存服务(动静分离)。 安装简单,方便,灵活。
高并发能支持几万并发连接,资源消耗少,在3万并发连接下开启10个nginx线程消耗的内存不到200M 。
springcloud gateWay概述
springCloud Gateway 是SpringCloud的一个全新项目,基于Spring 5.0 + SpringBoot 2.0 。旨在提供一种简单而有效的方式对API进行路由,以及强大的过滤功能:熔断、限流、监控、校验、鉴权等。
Gateway作为SpringCloud生态系统中的网关,目的是替换已经进入维护停更阶段的Zuul。并没有对Zuul 2.0 进行集成(zuul 太不争气),为了提高性能,Gateway基于WebFlux框架实现,而WebFlux框架底层则使用高性能的通信框架Netty。

Gateway网关具有如下特性:
- 动态路由,能匹配任何请求属性。
- 可以对指定路由进行predicate(断言)和Filter(过滤)。
- 集成了Hystrix的熔断功能。
- 请求限流
- 路径重写
其中三个核心概念:
Route(路由)
构建网关的基本模块,由ID,目标URI,一系列的断言和过滤器组成,如果断言为True则匹配该路由。
Predicate(断言)
参考java8的java.util.function.Predicate。开发人员可以匹配HTTP请求中的所有内容(例如请求头或者请求参数)如果请求与断言相匹配则进行相应的路由转发
Filter(过滤)
指Spring框架中GateWayFilter的实例,使用过滤器,可以在请求被路由前后对此请求进行判断或修改。
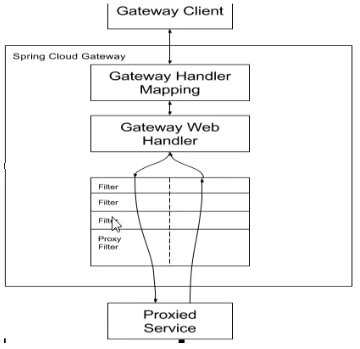
附上官网的流程图:

安装nginx
过程非常简单:
建立nginx的yum仓库 :
sudo rpm -ivh http://nginx.org/packages/centos/7/noarch/RPMS/nginx-release-centos-7-0.el7.ngx.noarch.rpm
安装:
yum install -y nginx
启动nginx服务、查看状态、 重新加载config配置
systemctl start nginx.service
systemctl status nginx.service
systemctl reload nginx.service  # 每次修改配置文件后,只需要执行此命令即可
nginx默认的网站目录为: /usr/share/nginx/html nginx全局的配置文件为:/etc/nginx/nginx.conf nginx默认的配置文件为: /etc/nginx/conf.d/default.conf nginx日志文件目录为:/var/log/nginx/
新建Gateway服务
主要依赖:
<!-- gateway -->
<dependency>
    <groupId>org.springframework.cloud</groupId>
    <artifactId>spring-cloud-starter-gateway</artifactId>
</dependency>
<!-- redis的reactive依赖用于限流分布式 -->
<!--<dependency>-->
    <!--<groupId>org.springframework.boot</groupId>-->
    <!--<artifactId>spring-boot-starter-data-redis-reactive</artifactId>-->
<!--</dependency>-->
<!-- hystrix -->
<dependency>
    <groupId>org.springframework.cloud</groupId>
    <artifactId>spring-cloud-starter-netflix-hystrix</artifactId>
</dependency>
<!-- eureka-client 网关作为微服务也要注册进去 -->
<dependency>
    <groupId>org.springframework.cloud</groupId>
    <artifactId>spring-cloud-starter-netflix-eureka-client</artifactId>
</dependency>
配置:
server:
  port: 9527

spring:
  application:
    name: cloud-gateway

  cloud:
    gateway:
      globalcors:
        cors-configurations:
          '[/**]':
            allowedHeaders: "*"
            allowedOrigins: "*"
#            allowedOrigins: "http://localhost/"  # 允许从所有allowedMethods配置的源请求发出CORS请求。
            allowedMethods:
              - POST
              - OPTIONS
              - GET
      httpclient:
        connect-timeout: 5000  # 毫秒。
        response-timeout: 5s
      discovery:
        locator:
          enabled: true
      routes:
        - id: a                # 路由的id,格式无固定规则但要求唯一,建议配合服务名
          uri: lb://CLOUD-HYSTRIX-PAYMENT-SERVER   #lb://服务名, 由网关实现负载均衡,底层使用ribbon
          predicates:
            - Path=/pay/**               # 断言,路径匹配则进行路由
          metadata:                      # 单独配置此路由的超时时间,要比所有已存在服务所配置的超时时间长或者相等,否则504
            response-timeout: 10000
            connect-timeout: 10000
          filters:
            - name: Hystrix
              args:
                name: fallback
                fallbackUri: forward:/fallback # fallback对应的uri,这里的uri仅支持forward
#            - StripPrefix=1 # 去掉前缀,具体实现参考StripPrefixGatewayFilterFactory

        - id: b
          uri: lb://CLOUD-HYSTRIX-PAYMENT-SERVER
          predicates:
            - Path=/lb
        - id: c
          uri: lb://CLOUD-HYSTRIX-PAYMENT-SERVER
          predicates:
            - Path=/payment/**
           - Header=Authorization,(token&)(.*?)

eureka:
  instance:
    instance-id: cloud-gateway-9527
    prefer-ip-address: true
  client:
    fetch-registry: true
    register-with-eureka: true
    service-url:
      defaultZone: http://192.168.31.105:17111/eureka/,http://192.168.31.106:17111/eureka/,http://192.168.31.107:17111/eureka/

info:
  myInfo: 网关9527
  app.name: cloud2020
  company.name: lzyz.fun
大体思路是:建立两个Gateway服务(9527,9528)注册进中心。当请求经过nginx则会被负载均衡将请求分发给两个gaetway服务,再由gateway服务转发给对应的业务处理服务(8001,8002)进行处理和返回结果。
配置nginx负载均衡,实现高可用网关集群
首先修改 nginx.conf 文件,添加服务器网关端口集群 :
user  nginx;
worker_processes  1;

error_log  /var/log/nginx/error.log warn;
pid        /var/run/nginx.pid;

# 配置Nginx worker进程最大打开文件数
worker_rlimit_nofile 65535;

events {
    # 单个进程允许的客户端最大连接数
    worker_connections  1024;
}

http {
    include       /etc/nginx/mime.types;
    default_type  application/octet-stream;
    # 日志格式
    log_format  main  '$remote_addr - $remote_user [$time_local] "$request" '
                      '$status $body_bytes_sent "$http_referer" '
                      '"$http_user_agent" "$http_x_forwarded_for"';

    access_log  /var/log/nginx/access.log  main;
    sendfile        on;
    #tcp_nopush     on;
    keepalive_timeout  65;
    #gzip  on;


    # 配置服务器网关端口集群
    upstream  gatewayServer{
        server 192.168.31.124:9527 weight=1;
        server 192.168.31.124:9528 weight=1;
    }


    # 导入其他配置
    include /etc/nginx/conf.d/*.conf;


    # 隐藏版本号
    server_tokens on;
}
然后在 /etc/nginx/conf.d 下建立一个fuzh1.conf 文件,添加配置:
server {
    listen       28080;                  # 服务监听端口
    server_name  192.168.31.124;         # 服务的域名或IP

    #charset koi8-r;
    access_log  /var/log/nginx/host.access.log  main;

    location / {
        proxy_pass http://gatewayServer/;  # 转发地址
    }
}
刷新配置:
systemctl reload nginx.service
解释下。 nginx会监听28080端口的请求,一旦有请求,将分发给两个gateway服务。
测试
接下来启动服务,可以在注册中心发现两个服务,一个业务处理服务集群,一个网关集群:

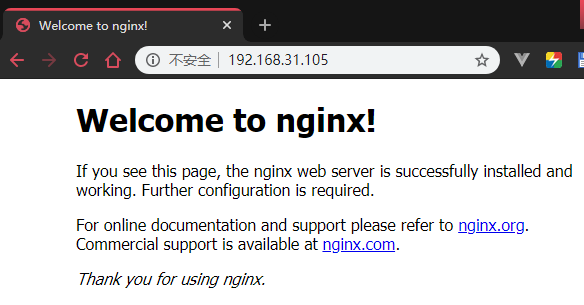
访问105机器的nginx首页是否正常

接下来访问28080端口,由于在gateway网关做了鉴权限制,没有token会返回错误信息:

看起来正常。接下来使用带token的请求来测试负载均衡是否正常:

可以观察到返回的serverPort分别是8001和8002,即实现了通过nginx实现对gateway的负载均衡和高可用。 即使gatway挂掉一台9527,还是会有另一台9528撑着。 如果不放心还可以对Nginx做一主一备处理。


